
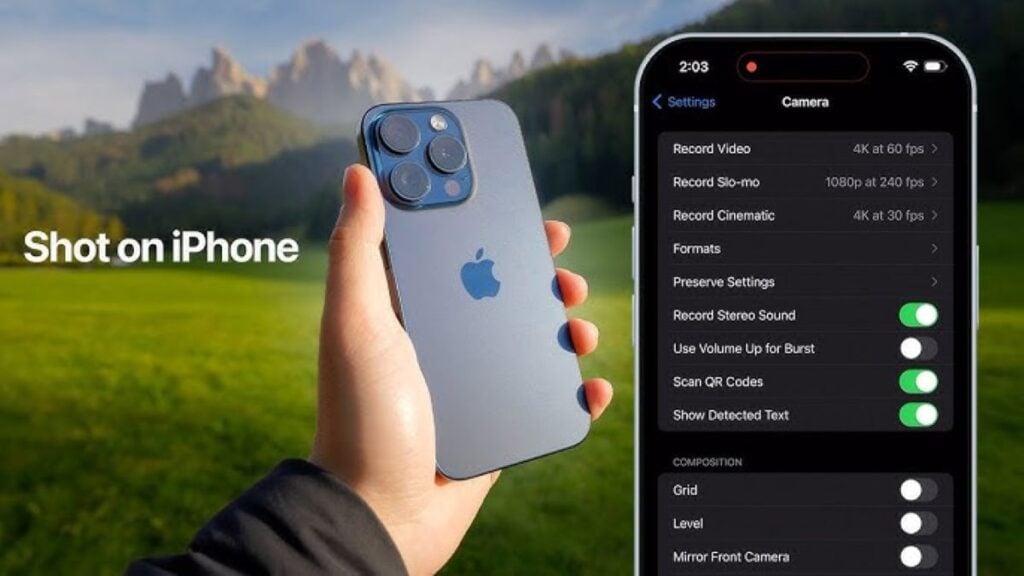

Have you ever scrolled past someone’s iPhone photos and thought, “wait, how did that come out of a phone?” Meanwhile your shots look… fine. Just fine. A little flat, a little soft, colors kind of meh. Same phone, wildly different results.
Turns out the gap isn’t really about gear or talent — it’s buried three menus deep in your Settings app, and most of us have never touched it.
So I did the thing: I tracked down a professional photographer and asked him point-blank what he changes on his iPhone before he even opens the Camera app. Because here’s the thing — pros aren’t shooting on some secret prototype. They’re using the same phone you are. They just know which defaults are quietly holding your photos back, and they know exactly which ones to flip.
The good news? You don’t need to understand aperture or ISO or any of that intimidating photography-speak to do this. It’s genuinely a “go into Settings, tap a few things on, done” situation. Give it ten minutes, tops.
One quick heads up before we dive in: depending on which iPhone you’ve got and what iOS version you’re running, some of these menus might be named slightly differently or tucked in a marginally different spot. Don’t panic if your screen doesn’t look pixel-for-pixel identical to what I describe — the settings themselves are still there.
Why Default Camera Settings Aren’t Enough
Here’s what nobody tells you when you buy an iPhone: it’s set up to take good enough photos for everybody, right out of the box. Not the best possible photo — the safest one.
That means Apple defaults you into things like smaller file formats that compress your images to save space, and settings that quietly reset themselves every time you close the Camera app. Convenient? Sure. But it also means you’re leaving real image quality on the table without ever knowing it — less detail, less flexibility to edit later, less of that “wow” factor when you zoom in.
It’s kind of like your phone is playing it safe so it doesn’t eat up all your storage or confuse anyone who just wants to snap a quick pic. Totally reasonable for most people. But if you actually want your photos to look noticeably better — the kind of better your friends ask about — you’ve gotta go in and tell your phone to stop holding back.
The fix is actually pretty simple, and it comes down to two things: turning on the higher-quality capture formats your iPhone has built in (yep, they’re already there, just switched off), and then locking those preferences in place so your phone doesn’t sneakily revert to default mode the next time you open the camera. That second part trips people up the most — you can turn everything on perfectly, and then wonder a week later why your photos look basic again. We’ll fix that too.
Let’s get into it.
Step-by-Step: How to Optimize Your iPhone Camera Settings
Alright, grab your phone — we’re doing this together. Nothing here requires you to be tech-savvy, I promise. Just follow along and tap where I tap.
Step 1: Find the Formats Menu
First things first: open Settings, scroll down and tap Camera, then tap Formats.
Quick tip so you don’t go hunting around like I did the first time — “Formats” sits right between “Record Sound” and “Preserve Settings” in that list. If you scroll past it, you’ve gone too far.
Step 2: Flip On High Efficiency, 24 MP, and ProRAW & Resolution Control
Okay, this is where the magic actually starts. In this menu, you want to make sure three things are toggled on:
- High Efficiency (under Camera Capture)
- 24 MP (under Photo Mode)
- ProRAW & Resolution Control
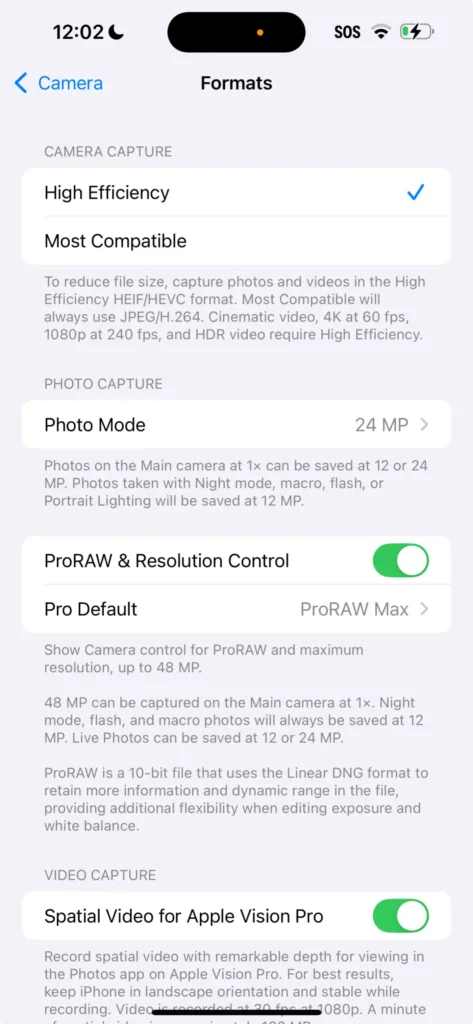
I know, I know — none of these sound thrilling. But here’s what’s actually happening: your iPhone, by default, is kind of lowballing you on resolution to save space. Turning on 24 MP means every photo you take is going to have way more detail packed into it — more room to crop, zoom, and edit without things turning to mush. High Efficiency keeps those bigger files from eating your entire storage overnight. And ProRAW & Resolution Control basically unlocks your phone’s “pro” shooting mode, giving you way more flexibility to fine-tune photos afterward instead of being stuck with whatever your camera decided looked good in the moment.
Think of it like finally taking the training wheels off.
Step 3: Set Your Pro Default
Now tap into Pro Default. Here, you want to see a checkmark next to “ProRAW Max (Up to 48MP).” This is the good stuff — it tells your phone “hey, whenever I shoot in Pro mode, give me the absolute maximum quality you’ve got.”
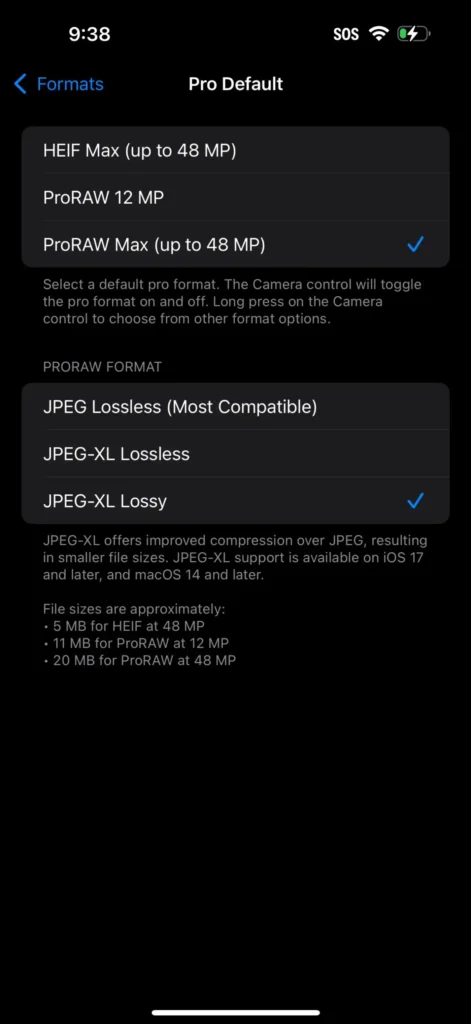
If you’ve got an iPhone 16 Pro or Pro Max, you’ll also see an option for JPEG-XL Lossy — go ahead and check that one too. It’s a newer file format that keeps image quality high without absolutely destroying your storage, which is honestly a nice bonus. (Sorry to everyone on an older model — this one’s not available for you yet.)
Step 4: Lock Everything In With Preserve Settings
Here’s the step people skip, and then they get mad two days later when their phone “forgot” everything. Head back to the main Camera menu and tap Preserve Settings.
Make sure all of these are toggled on:
- Camera Mode
- Creative Controls
- Macro Control
- Exposure Adjustment
- Night Mode
- Portrait Zoom
- ProRaw & Resolution Control
- Live Photo
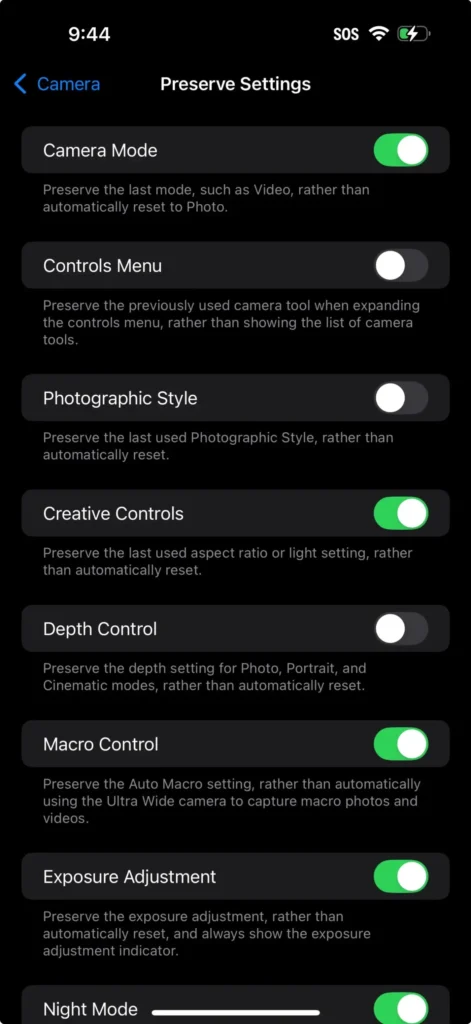
Basically, this whole menu exists so your iPhone stops resetting to default every single time you close and reopen the Camera app. Without this, you could do everything above perfectly, take one great photo, close the app… and be right back to square one the next time you go to shoot. Flipping these on means your setup actually sticks.
Step 5: Dial In Your Composition Tools
Last stop in Settings — go back to the Camera menu one more time.
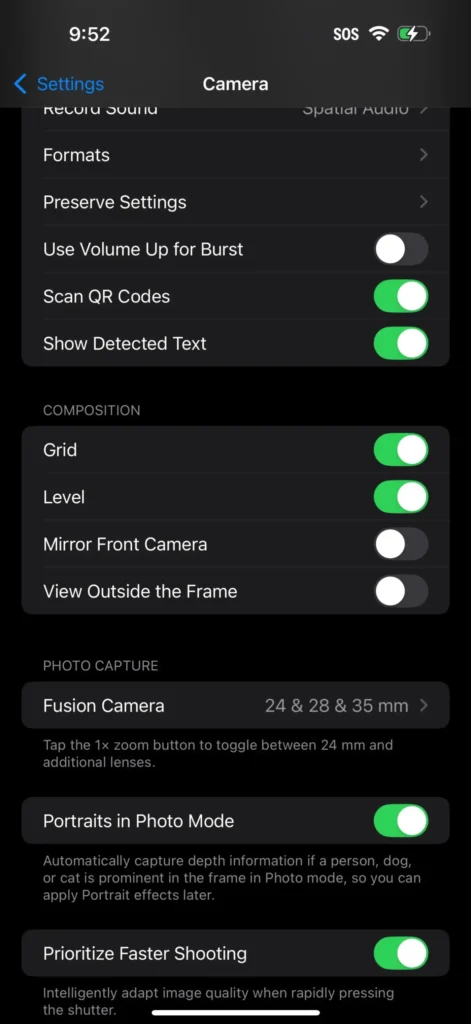
Turn on Grid, and make sure Level is toggled on too. This one’s straight from the photographer himself — he says these two are what actually help him line up his shots so they look intentional instead of slightly crooked (we’ve all got that one tilted horizon photo we’re embarrassed about).
While you’re there, also make sure these are enabled:
- Portraits in Photo Mode
- Prioritize Faster Shooting
- Lens Correction
- Macro Control
These are less flashy, more “quality of life” — they help your photos look more natural, keep you from missing fast-moving shots, and correct for weird lens distortion you might not even notice until it’s fixed.
And that’s it — you’re officially done in the Settings app. Deep breath, you survived it. Next up: what to actually do once you’re in the Camera app taking real photos.
Inside the Camera App: What to Do While Shooting
Alright, Settings is done — now let’s actually take some photos. This part’s way faster, I promise, just two things to remember.
First, open up your Camera app and toggle on “Raw Max.” You’ll see this option right there while you’re shooting, usually near the top of the screen. This basically tells your phone “don’t compress anything, don’t cut corners — give me the full-quality file every single time.” Since you already unlocked all that resolution and RAW capability back in Settings, this is what actually puts it to use in the moment.
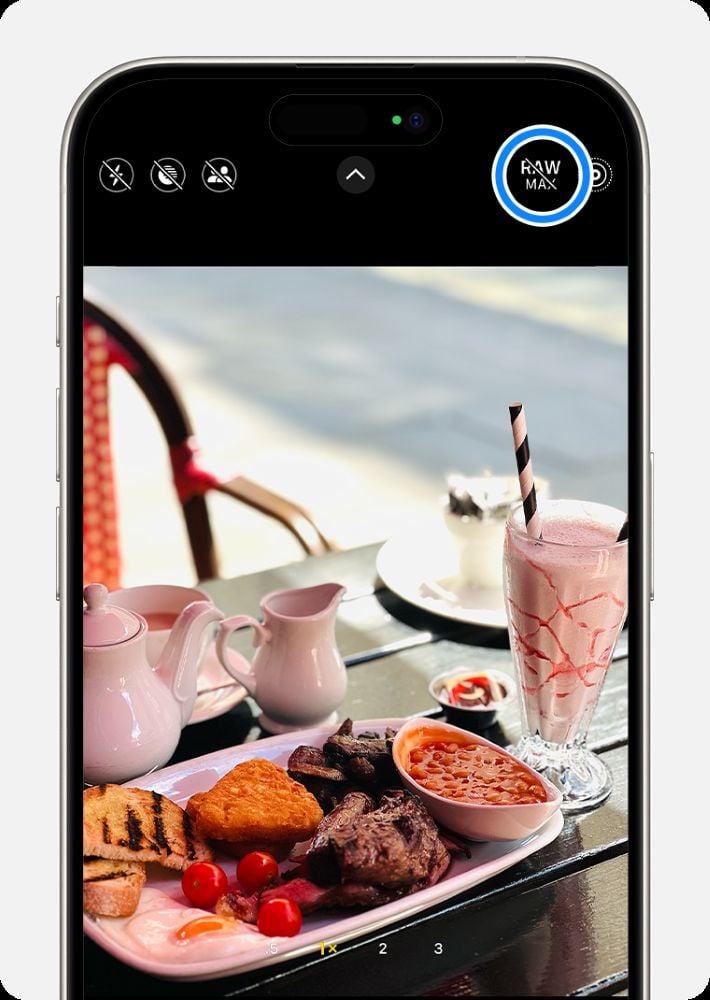
Second — and my photographer was pretty adamant about this one — always shoot at 1x. Not the 0.5x ultra-wide, not zoomed in at 2x or 3x. Just 1x, plain and simple.
Here’s why that matters: 1x is your main sensor, aka the “wide” camera, and it’s genuinely the best lens on your iPhone. It’s got the biggest sensor, lets in the most light, and captures the most detail. The ultra-wide is great for squeezing a whole room or landscape into frame, but it tends to soften detail and struggle more in low light. And anything zoomed in past 1x is often relying on digital zoom or a smaller telephoto sensor, which just can’t compete on quality. So unless you’ve got a specific reason to switch lenses, 1x is your best friend.
Honestly, that’s it. Toggle Raw Max, stick to 1x, and you’re already shooting like someone who knows what they’re doing.
Read Also: How to Make Your Samsung Look Like an iPhone in 6 Easy Steps
Before & After (Optional but Recommended)
Okay, this part’s just for fun — but also kind of the most satisfying part of this whole process. Take a photo of literally anything (your coffee, your dog, your questionable desk setup) with your old default settings. Then take the exact same shot again with everything we just changed turned on. Put them side by side.
I’m telling you, the difference is not subtle.
Here’s what to actually look for when you compare them:
- Dynamic range — check out the shadows and highlights. With the new settings, you’ll notice way more detail in both the darkest and brightest parts of the photo instead of things just blowing out or turning to mush.
- Detail and sharpness — zoom way in on both photos. The optimized shot is going to hold up so much better, especially if you crop in tight.
- Low-light performance — try this comparison somewhere dim, like at night or indoors with the lights low. This is honestly where the difference is most obvious.
- Editing flexibility — if you drop both photos into an editing app and start playing with exposure or color, you’ll feel it immediately. The RAW file just gives you so much more room to push things around without everything falling apart.
Drop your before-and-afters in wherever feels right — a photo dump, your camera roll, wherever. But do the comparison at least once for yourself. It’s genuinely the moment this whole thing clicks and you go “oh… that’s the difference.”
A Few Practical Trade-Offs to Know
Before you go flip on every single toggle and run off to become the next big iPhone photographer, let’s have a quick honest chat — because this upgrade isn’t entirely free. There’s a couple things worth knowing so you’re not blindsided later.
First up: those ProRAW and 48MP files? They’re chunky. Like, noticeably bigger than your regular photos — we’re talking sometimes 5-10x the file size of a normal shot. Which means your storage is going to fill up faster than you’re used to. If you’re already the person getting that “storage almost full” notification every other week, this is going to accelerate that timeline. Not a dealbreaker, just something to plan around.
Second thing: RAW photos are not meant to be looked at straight out of the camera. They’re intentionally flat and kind of unedited-looking on purpose — that’s the whole point, it gives you way more room to adjust things later. But it does mean you can’t just snap a RAW photo and immediately post it like you would a regular JPEG. It needs a quick pass in an editing app first (even just bumping contrast and saturation a little in your Photos app does wonders). If you’re not someone who wants to spend even two minutes editing, this might feel like an extra step you didn’t sign up for.
And because of both of those things, I’d genuinely recommend getting some kind of backup system going if you’re going to shoot RAW regularly — iCloud storage bump, an external drive, Google Photos, whatever works for you. Nothing worse than filling up your phone completely and then realizing you have nowhere for the RAW files to go.
None of this is meant to scare you off, by the way. It’s just the trade-off for better quality — a little more storage, a little more editing, a lot better photos.
Quick-Reference Checklist
Okay, I know that was a lot of tapping around in Settings, so here’s the condensed version. Bookmark this, screenshot it, whatever you need to do — this is your cheat sheet for next time.
In Settings → Camera → Formats:
- High Efficiency (Camera Capture)
- 24 MP (Photo Mode)
- ProRAW & Resolution Control
In Pro Default:
- ProRAW Max (Up to 48MP)
- JPEG-XL Lossy (iPhone 16 Pro / Pro Max only)
In Preserve Settings:
- Camera Mode
- Creative Controls
- Macro Control
- Exposure Adjustment
- Night Mode
- Portrait Zoom
- ProRaw & Resolution Control
- Live Photo
Back in the main Camera menu:
- Grid
- Level
- Portraits in Photo Mode
- Prioritize Faster Shooting
- Lens Correction
- Macro Control
While actually shooting:
- Toggle “Raw Max” on
- Shoot at 1x whenever possible
Fifteen toggles, one time, and you’re set for good.
Conclusion
And that’s really the whole thing. The best part about all of this? It’s a total “set it and forget it” situation. You’re not doing anything extra every time you pull out your camera — you spend ten minutes now, and every photo after this is just automatically better. That’s it. That’s the whole trick.
Photography this way is way less about being naturally talented and way more about just knowing which switches to flip. Turns out your iPhone had a pro-level camera hiding in it this whole time — it just needed you to actually go tell it to use it.
So go do the before-and-after thing we talked about earlier. Take a photo with your old settings, take one with the new setup, and really look at them side by side. I’d genuinely love to know if you notice the same jump I did — drop a comment and let us know how yours turned out.
Read Also: 10 Hidden Things Your iPhone Volume Buttons Can Do (Besides Adjusting Sound)